Global Manager
Global Manager is designed for arranging multiple video clips used in the same 3D scene. It aims at providing a similar graphic interface with Blender’s Video Sequencer, where the user can switch among multiple video strips to move, trim, loop or change their speed in the timeline. It is also easier to insert new videos into the scene in this mode.
When selecting Global Manager during adding the playback controller, the add-on panel no longer shows the playhead keyframe channel. Instead, a button Global Manager appears in the panel that creates and switches to a new workspace.
After using Global Manager for the first time in a scene, the add-on will create a new empty object named TfxPlaybackManager that stores all the animation data related to video playback. Please do not delete this object.
Workspace
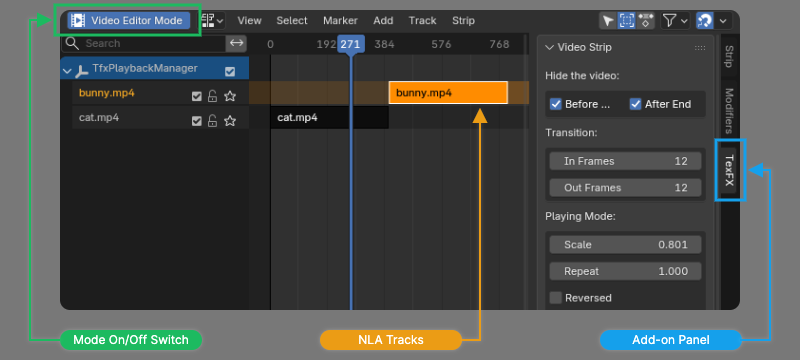
The add-on introduces a new workspace named “Media Playback”. The workspace is based on Blender NLA Editor, with a new switch button named [Video Editor Mode] added at the left side, and a side panel named TexFX added at the right side.
Each strip in the NLA Editor’s timeline represents a video. Initially, all tracks are locked. The user needs to click the [Video Editor Mode] button to unlock them. Entering this mode will change some behaviors of Blender, making them different from the normal NLA Editor. Please read the following instructions before using this mode.
Please perform all updates in the TexFX side panel. Avoid using the native Strip or Modifiers tabs. Please also do not unlock the NLA tracks manually when the Video Editor mode is not running.
Video Editor Mode
Entering the Video Editor mode unlocks all NLA tracks. The user can drag the strips to adjust its position in the timeline. Selecting a strip will also select the corresponding object in the 3D viewport.
Various playback patterns can be achieved by the mouse operations in the timeline region and the value setting in the TexFX panel.
Either switching to another workspace/scene or undoing will exit the Video Editor mode, requiring the user to later start the mode again manually.
After setting new property values in the side panel, sometimes the 3D viewport does not show the latest result, and it requires the user to click once more in the timeline region.
Speed Control
The video playback speed can be adjusted in the following ways:
- Set the Scale value in the side panel, e.g.
0.5means 2x speed. - Select the strip and press
[S]key.
Looping
Setting Repeat to a value greater than 1 in the side panel will loop the video. To cancel looping, set Repeat back to 1.
Freeze Frame Extension
Freeze frames can be added before or after the video to prolong it in the Extend subpanel.
- Increasing the End value adds still images after the last frame of the video.
- Decreasing the Start value adds still images before the first frame of the video.
To cancel extension and remove freeze frames, click the Reset button.
Trimming
Dragging the edge of a selected strip will turn the cursor into a knife shape. This will trim the video to change the portion played.
To trim a video, looping or extension must be cancelled at first. Otherwise, the trimming operation is equivalent of setting Repeat or Extend values.
Visibility
The visibility of a video outside the strip region can be set in the [Hide the Video] subpanel. It can hide the video before the playing starts and/or after the playing ends.
Synchronizing Keyframes
By default, after dragging or resizing a strip, if any effects on this video have keyframes, they will move with the strip to keep synchronized.
In addition, the user can also make the object and material keyframes follow the strip, by checking corresponding options in the [Editor Setting] > [Synchronize Keyframes] subpanel. Please do not use these options if an object or a material contains multiple video strips. Otherwise, the keyframe movement result may be unexpected.
Binding Transition Effects
If a video is controlled by Global Manager and has transition effects, clicking the ![]() icon besides In and Out parameters will bind the transition to the strip. After that, the transition length can be adjusted in the
icon besides In and Out parameters will bind the transition to the strip. After that, the transition length can be adjusted in the TexFX panel, and the transition will synchronize with the strip movement.
Append Media
The button Append Media in the side panel will open the file browser, allowing the user to select a new media file and insert it in the timeline, right after the selected strip. The object location, mesh and material data of the new media are all duplicated from the selected strip.
Please note that two completely overlapping faces usually lead to render artifacts. Therefore, the add-on sets a tiny delta location when adding a new object. The user can change this offset value.